Export Columns
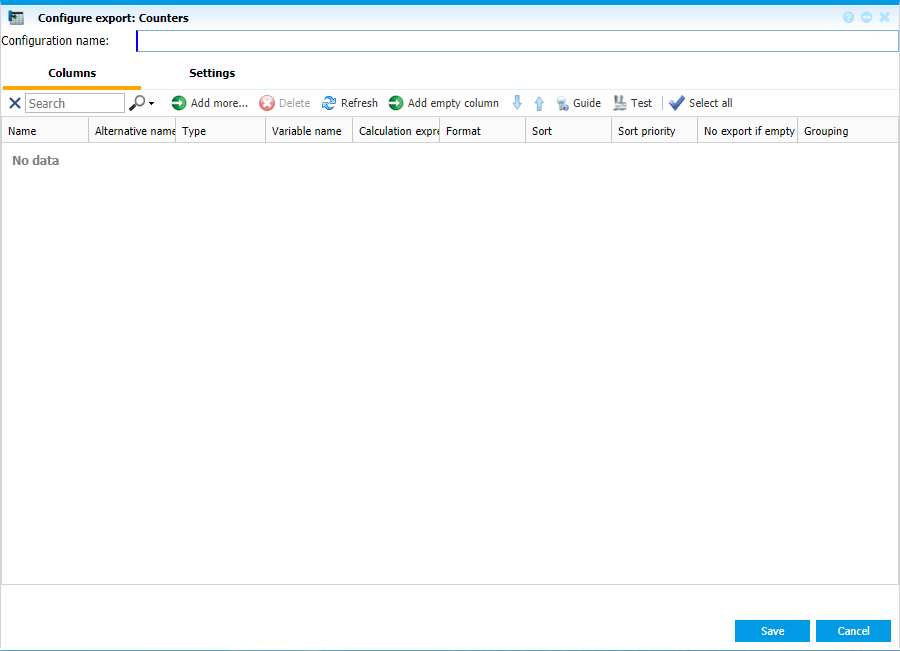
To configure an export, go to Reports - Export Definitions, select the export and click  . Click
  to add a new configuration.
 |
|
Configure Export page in Astrow Web
|
Name the configuration to be saved in the configuration list.
In tab Columns, you can choose the information to appear in the export by selecting the type of information desired. Click  to add data.
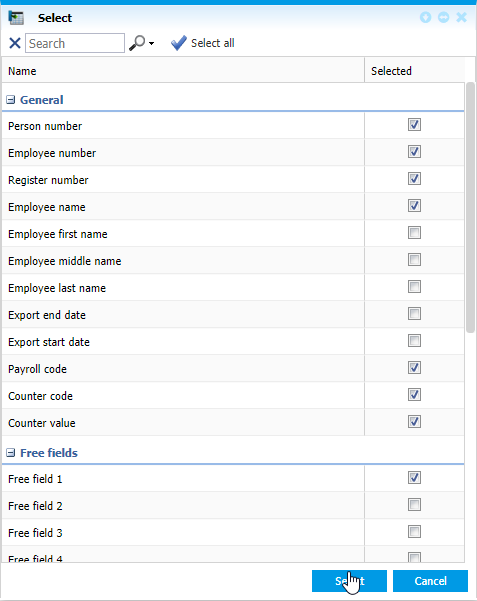
Select window opens. Check the data you need for the export:
 |
|
Select page in Reports - Configure Exports in Astrow Web
|
Use the search  field to search the items by name. Use
  to check all items or
  in case you change your mind.
New export columns
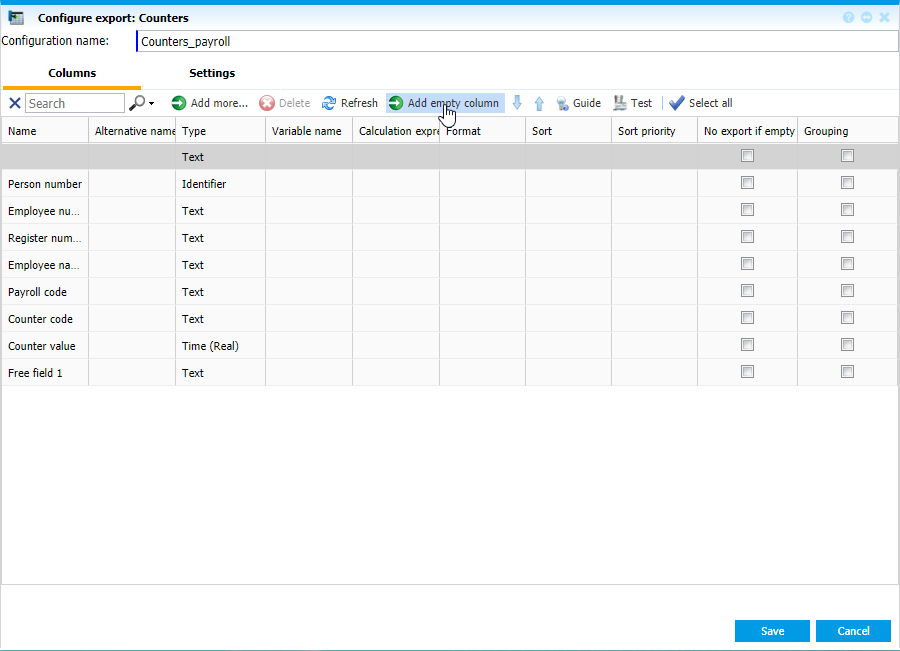
To add new columns, click  . A new text column will be added to your export. To delete a column, use the button
  .
.
 |
|
New column in Configure Export page tab Column in Astrow Web
|
Rearrange the order of columns
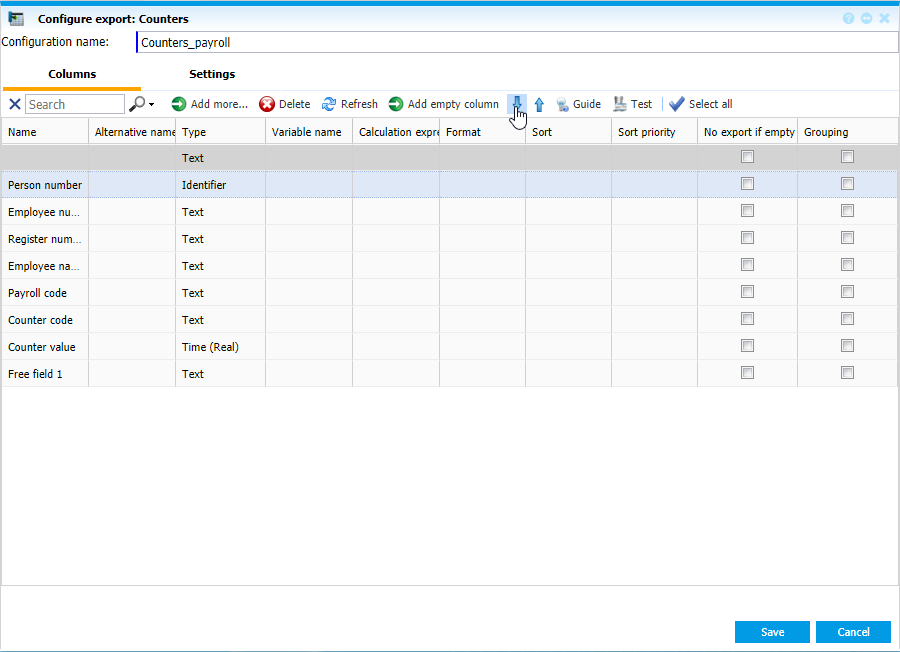
You can anytime rearrange the order of the columns using the buttons down  or up
or up  or simply drag-and-drop.
 |
|
Rearranging columns in Configure Export page tab Column in Astrow Web
|
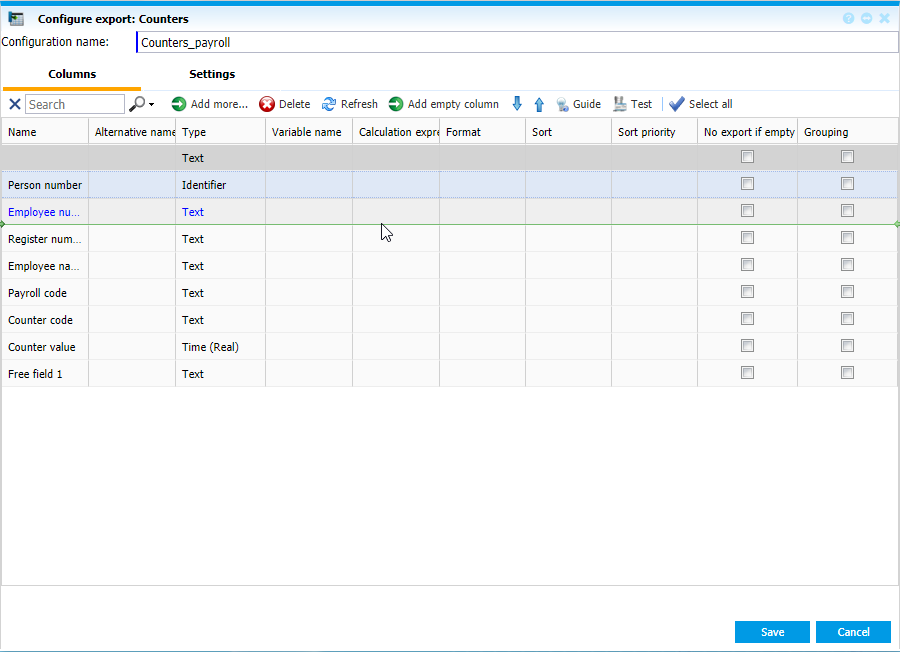
When dragging and dropping you will be guided by the green line:
 |
|
Rearranging columns with drag-and-drop in Configure Export page tab Column in Astrow Web
|
Columns definition
-
Name: The default name of the field. This cannot be changed in the export. If you want the column to appear with a different name, use the field Alternative name. In case nothing is mentioned in the field Alternative name, the column will take the default name.
-
Alternative name: A custom name for the field. Double-click on the appropriate cell to add a new name. If there is any alternative name, the application will use that one when generating the export.
-
Type: Here you can define/change the type for a new added column. The type of the existing columns cannot be changed. Depending on the new column you add, this can be Text, Time (Real), Real and Integer. Double-click on the appropriate cell to define a new type.
-
Variable name: You must use this field for already existing columns if you want to add a new column which will treat the values from this column as variables. E.g. Counter value. If you take counter values as variables, you can add a new column in which you can make a certain calculation based on this value. For more details, see Add a new column with a variable value in the export explained below.
-
Calculation expression: Here you can add a common arithmetic expression (*, /, +, -, () or || ) for your formula in the new added column, related to a known variable. For more details, see Add a new column with a variable value in the export explained below.
-
Format: Use the formats described in Export Guide. Copy and paste the format desired in column Format. For Text columns, you can have a Space replacement. Meaning that instead of the space replacement defined in tab Settings (dot, comma, etc.) you can have a full text or other character. E.g. Format is {0,20} {abc} - the text will be displayed with the format {0,20}, but instead of space text abc will appear.
|
|
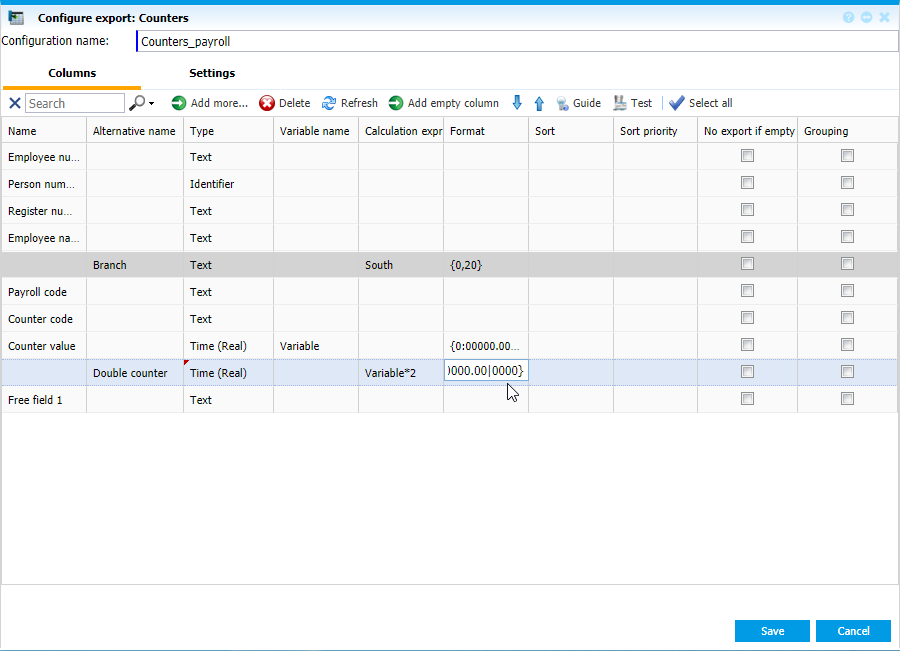
In the Export configuration, for the columns of type Counter value (T or C), it is possible to specify 2 formats – first format is for T counters and second format is for C counters. Formats need to be separated by “|” character without spaces:
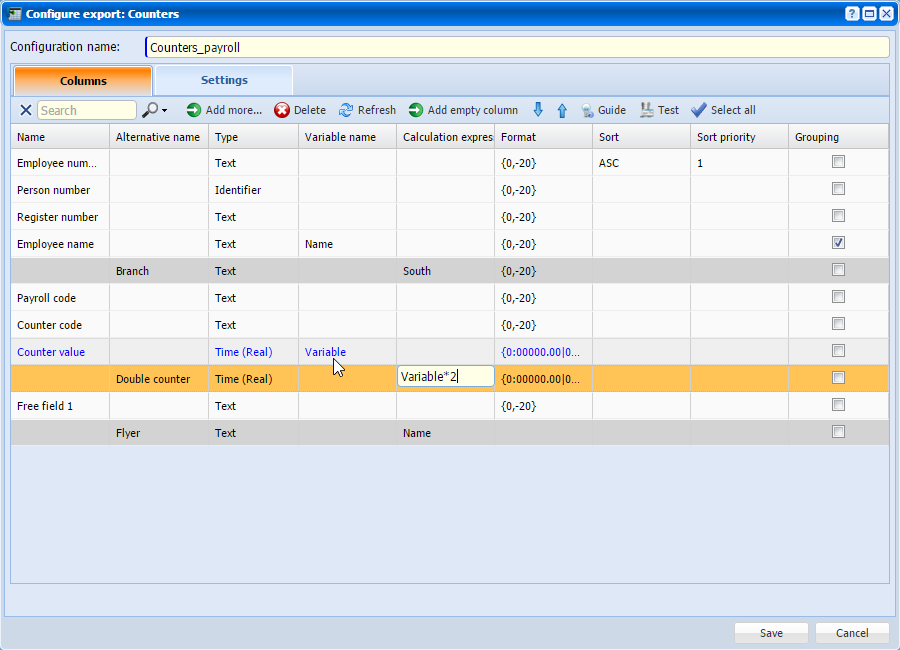 This format enable users to select both T and C counters in an export and to format each type differently since T counters are real numbers while C counters are integer numbers.
|
-
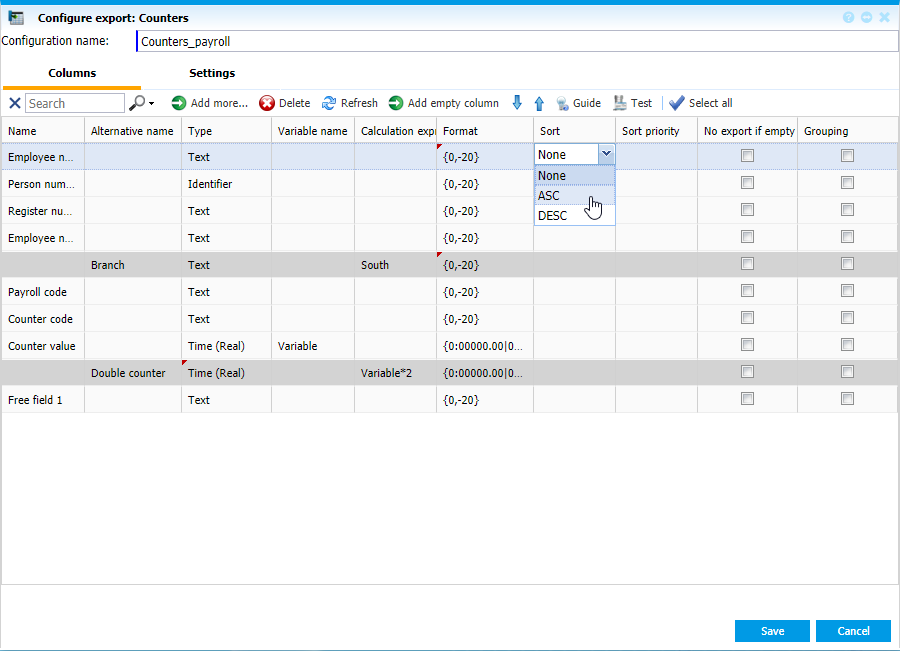
Sort: Here you can define how to sort the data in a column, ascending or descending.
-
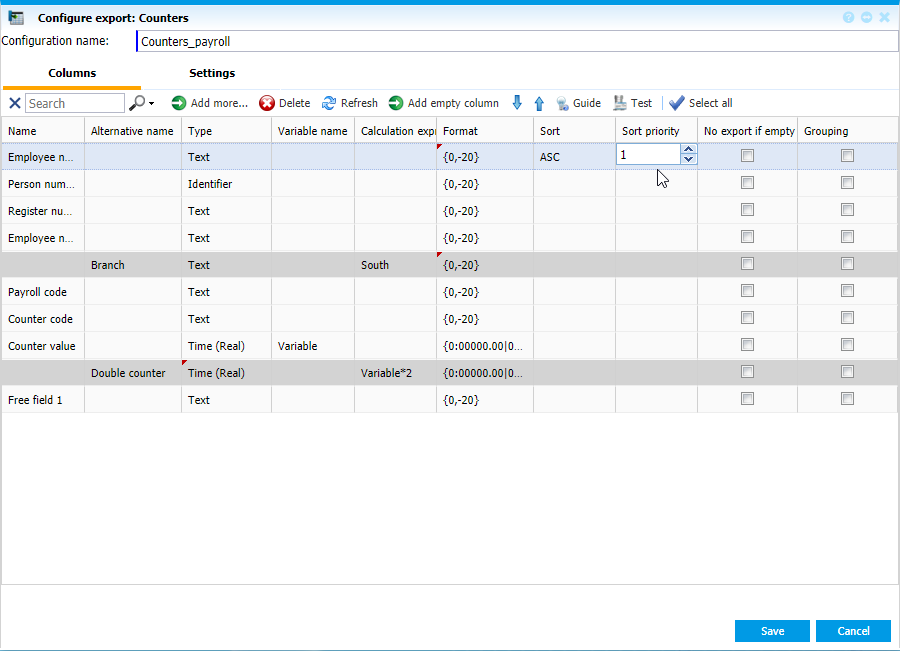
Sort priority: Here you can decide the columns' priority when sorting the data.
-
Grouping: If the option is checked, the column will appear grouped in the export. For more information, see Grouping data in the export below.
Add a new column with a fixed value in the export
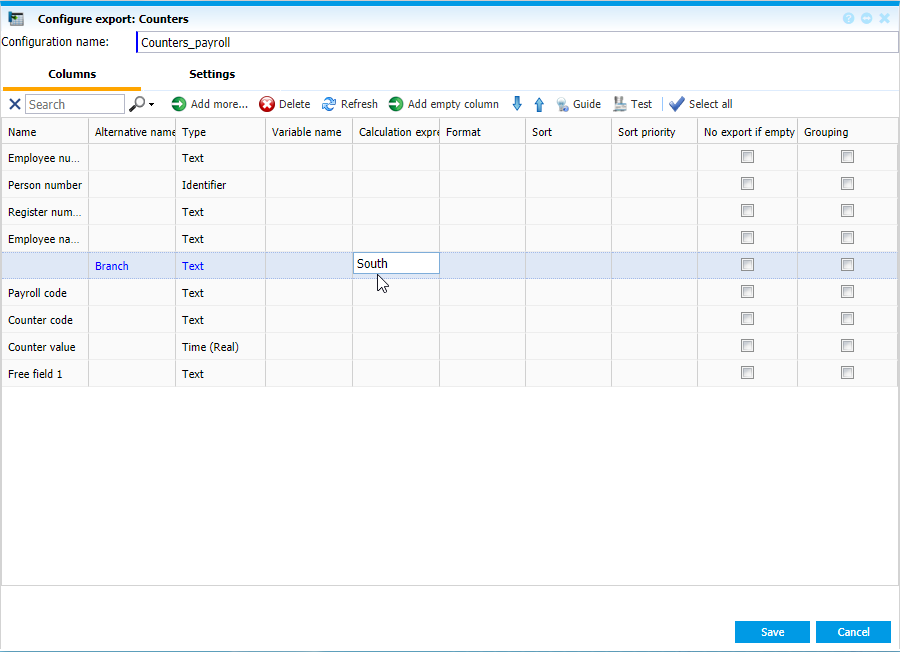
To add a column with a fixed value in the export, click  on tab Column in ordered view mode, position it and edit it. You should add an alternative name and a fixed value in field Calculation expression. Use the Guide to choose the format.
 |
|
Example of adding a new fixed value column in Configure Export page tab Column in Astrow Web
|
Add a new column with a variable value in the export
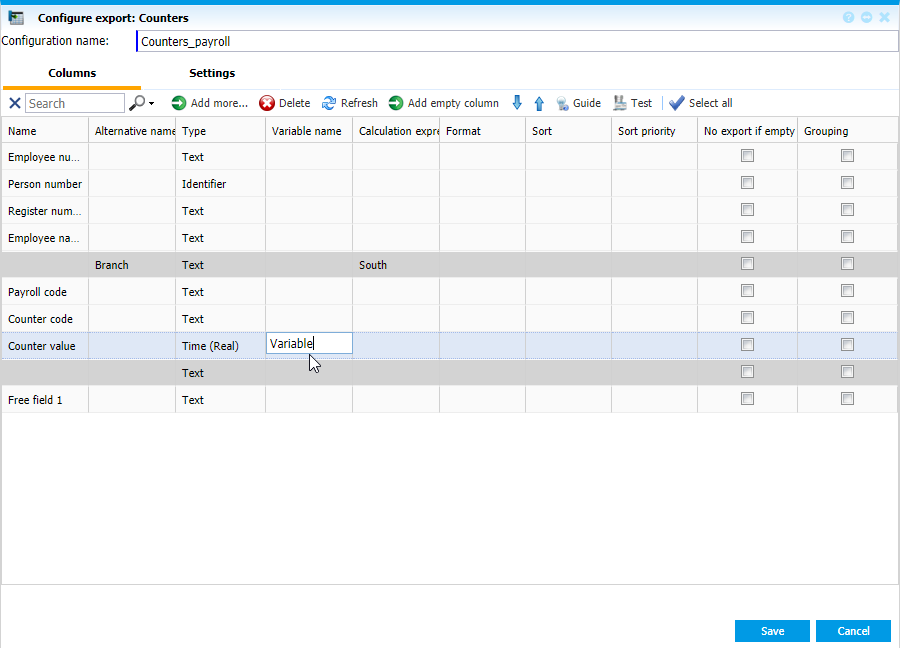
To add a column with a variable value in the export, click  on tab Column in ordered view mode, position it and edit it. Next, choose the variable to relate to, e.g. Counter value. For example you need a column to double the value from an overtime counter. Write a Variable name for the Counter value:
 |
|
Example of adding a variable name to a default variable value column in Configure Export page tab Column in Astrow Web
|
Make sure your new variable is defined with a proper type, e.g. Time(Real).
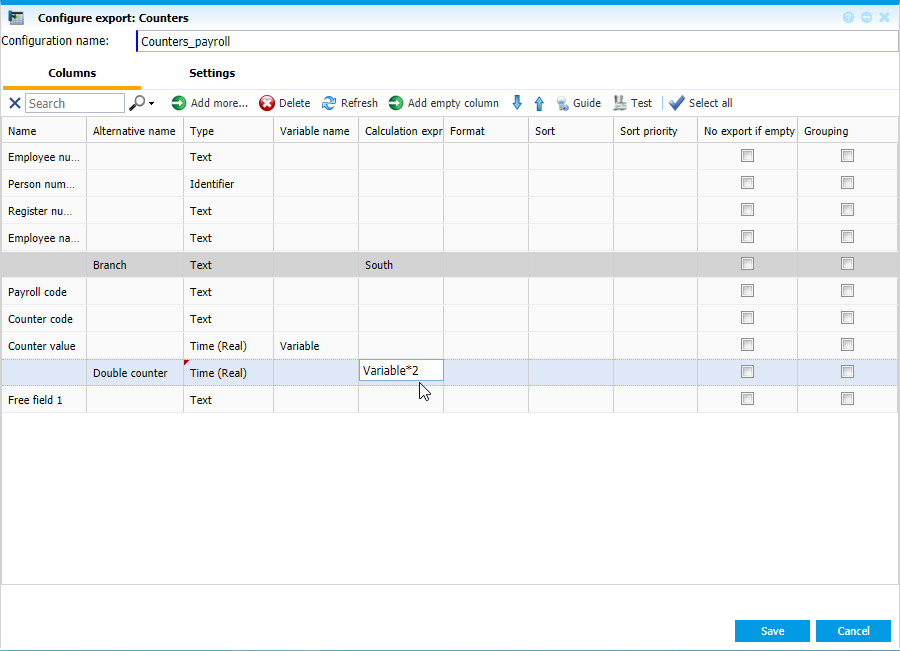
In the new column added, write the Alternative name, select the type (same as the variable you use) and define the calculation expression:
 |
|
Example of adding a calculation expression for a new column added in Configure Export page tab Column in Astrow Web
|
Make sure both variables are the same format:
 |
|
Example of formats when adding a calculation expression with a new column added in Configure Export page tab Column in Astrow Web
|
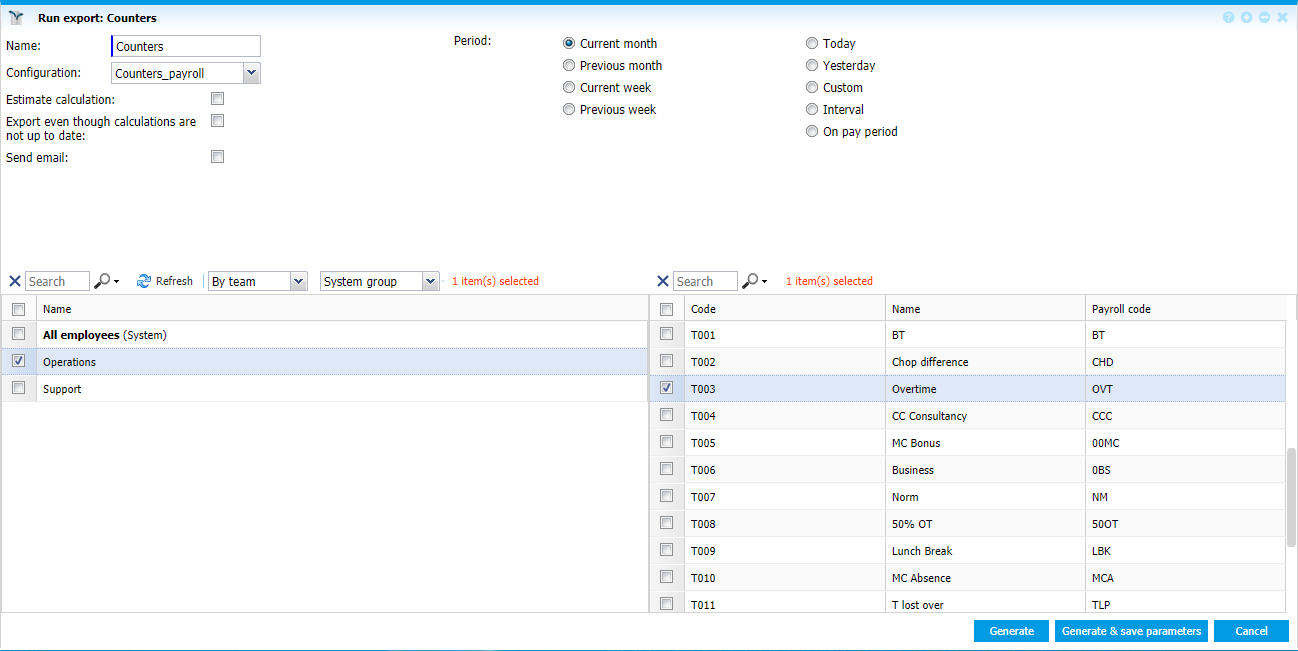
After finishing the export configuration, when running the export (see Run Export for more details), you will need to choose the counter:
 |
|
Example of running an export in Astrow Web
|
In this example, the column Double counter will double the value of the counter chosen when running the export, Overtime.
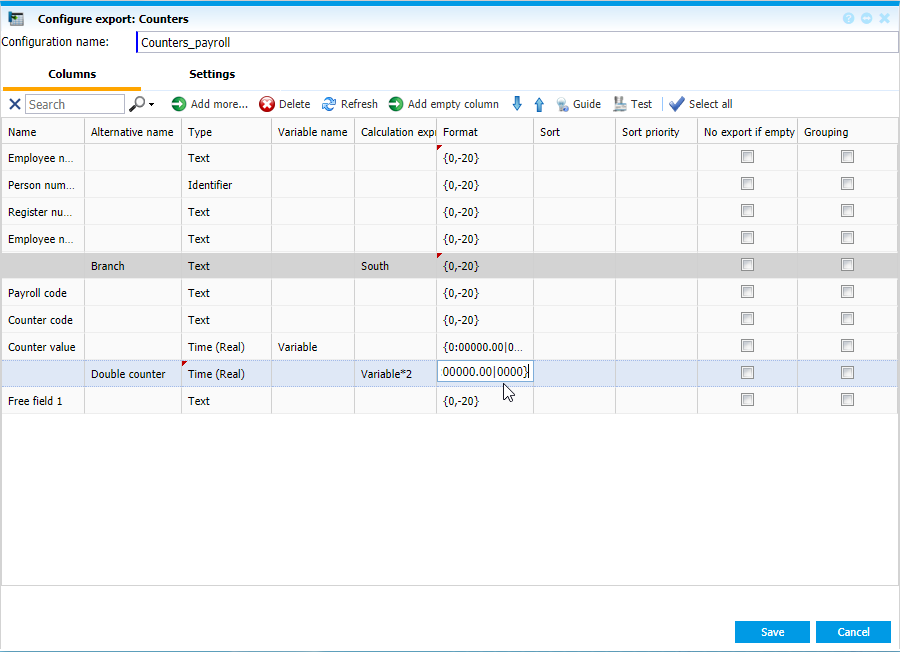
Once you’ve added the extra columns desired, you can start adding alternative names (optional) and formatting the columns. Use the formats described in Guide. Copy and paste the format desired in column Format.
 |
|
Example of formatting a column added by user in Configure Export page tab Column in Astrow Web
|
Choose to sort columns ascending or descending:
 |
|
Example of selecting the type of sorting when adding a column in Configure Export page tab Column in Astrow Web
|
Sort the column priority, if needed:
 |
|
Example of sorting the priority of a column in Configure Export page tab Column in Astrow Web
|
Write a substring value for text variables in the export
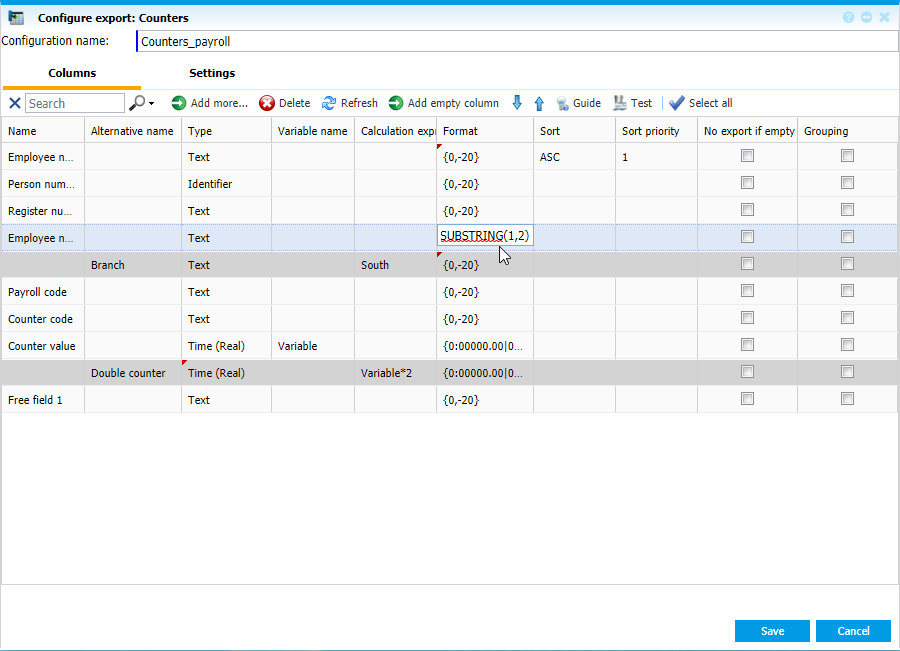
To subtract text variables in your export, you will write in the column Format an expression as SUBSTRING(x,y), where x is the first character to be displayed in the export and y is how many character displayed after x. E.g. SUBSTRING(2,3) from text ”house” will be ous. In the example below it will take the first 2 characters from name.
 |
|
Example of substring expression in Configure Export page tab Column in Astrow Web
|
Duplicating a text column
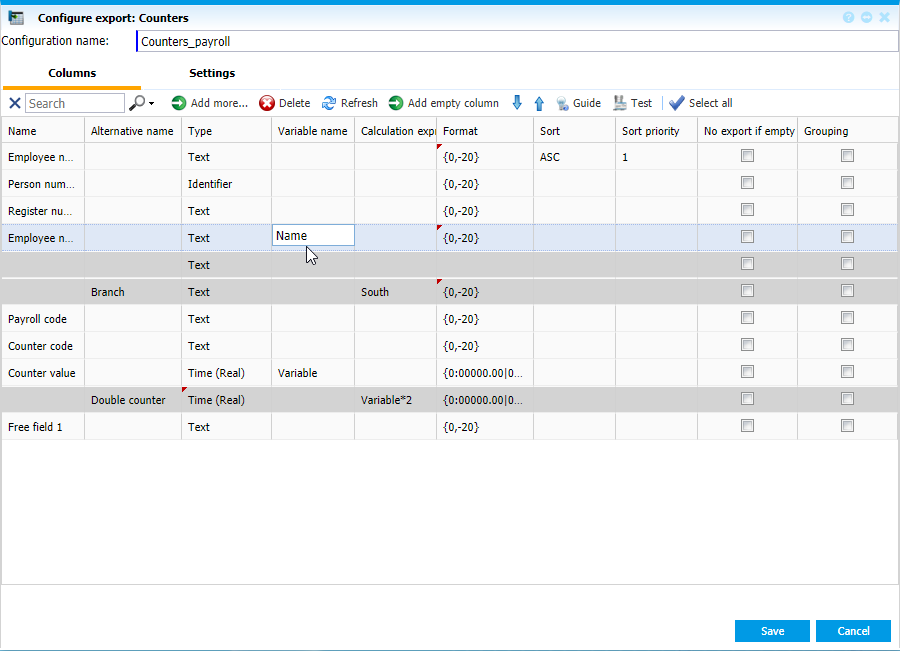
To duplicate a text column, click  on tab Column in ordered view mode, position it and edit it. Next, choose the variable to relate to, e.g. Employee name. For example you need a column to duplicate the name. Write a Variable name for the Employee name:
 |
|
Example of adding a variable name to a default variable value column in Configure Export page tab Column in Astrow Web
|
Make sure your new variable is defined as Text.
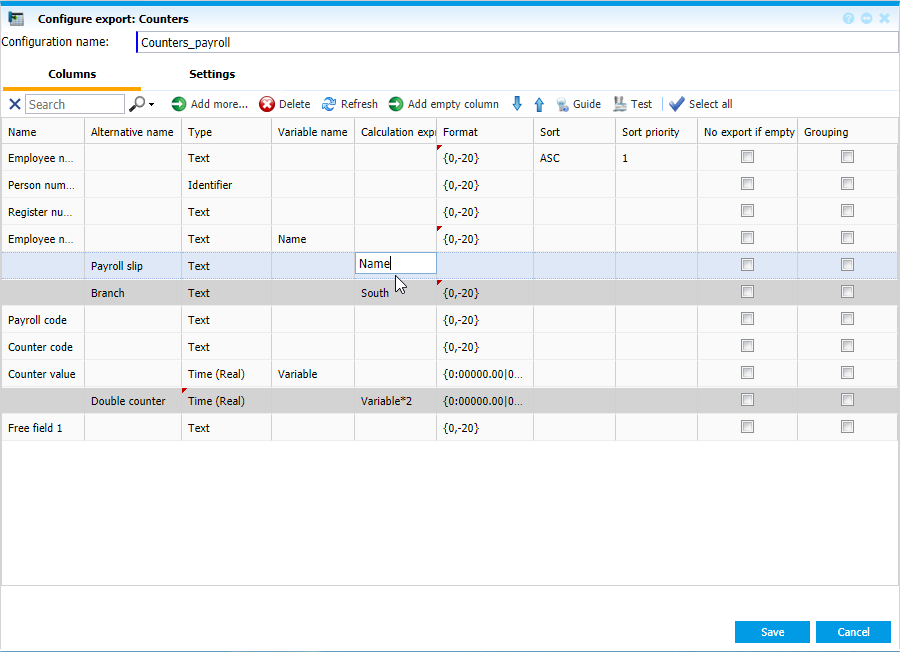
In the new column added, write the Alternative name, select the type (same as the variable you use) and define the same variable name in Calculation expression:
 |
|
Example of duplicating a text in Configure Export page tab Column in Astrow Web
|
This will duplicate the expression in your export.
Grouping data in the export
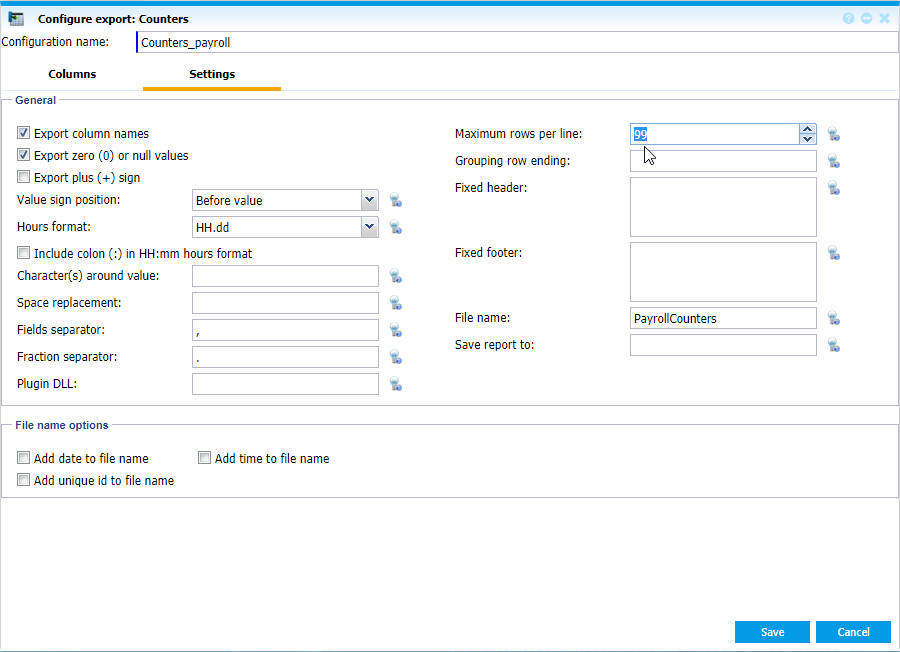
You can group data in your export after a criteria chosen (e.g. person number, employee name, employee number etc.). This way, data following your grouping item in the export configuration will be grouped in a one line up to Maximum rows per line defined in Settings:
 |
|
Example of setting for Maximum rows per line when grouping in Configure Export page tab Settings in Astrow Web
|
The more the value here, the more likely your data to fit one line.
Example:
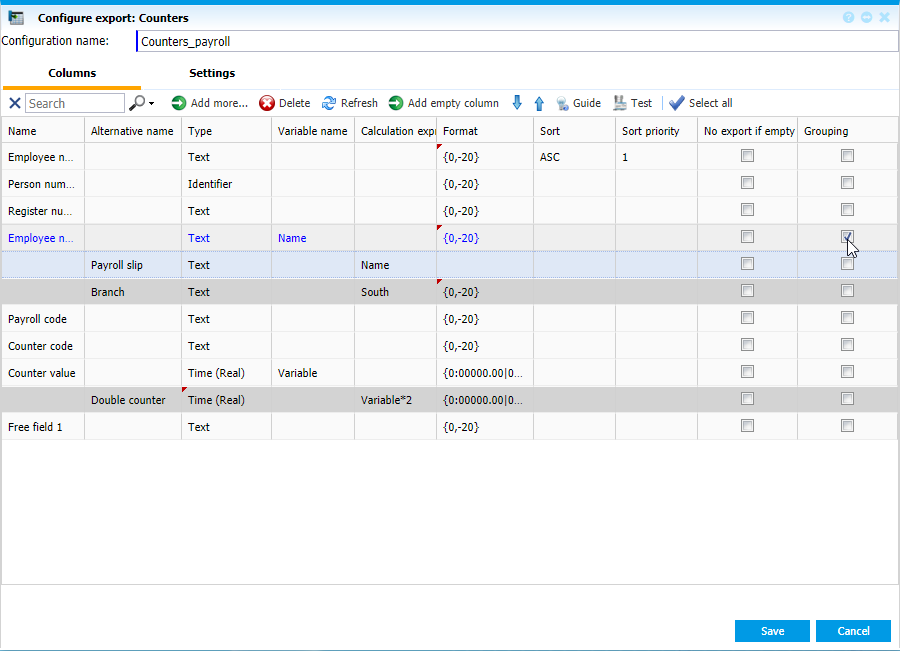
1. Add a grouping criteria, e.g. Employee name. The data in this case will be grouped by employee name. That means anything comes after Employee name in the definition will be considered succession one succession row (in this case payroll code, counter code, counter value).
 |
|
Example of setting a grouping item in Configure Export page tab Settings in Astrow Web
|
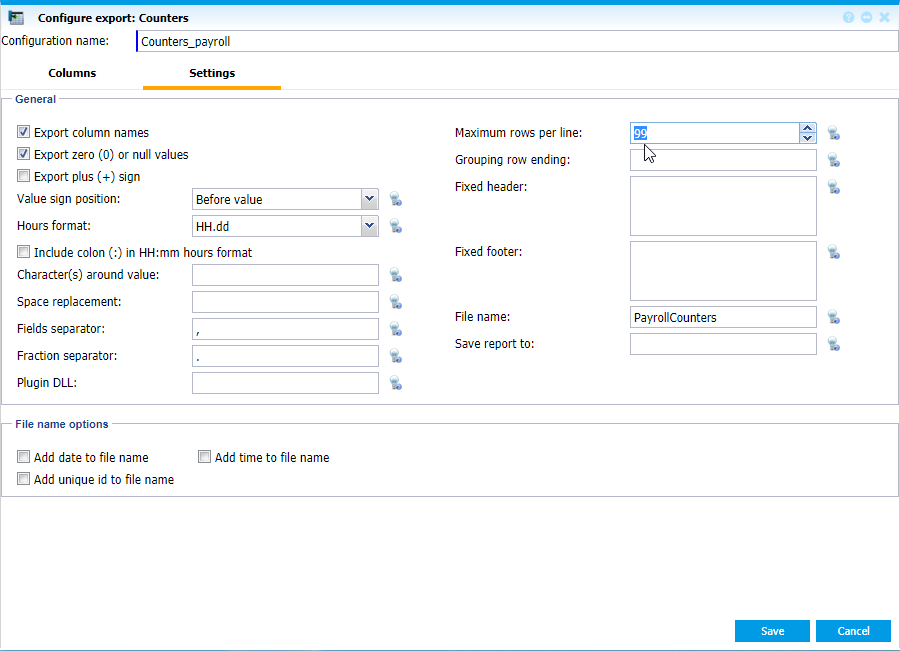
2. Note the Maximum rows per line. If 1 (default), the grouping will not be done, it will insert one row of information per line. To fit all rows of information grouped by a certain criteria in one line, you need to put there a bigger number. Grouping row ending will add the character defined at the end of the line.
 |
|
Example of setting for Maximum rows per line and Grouping row ending when grouping in Configure Export page tab Settings in Astrow Web
|
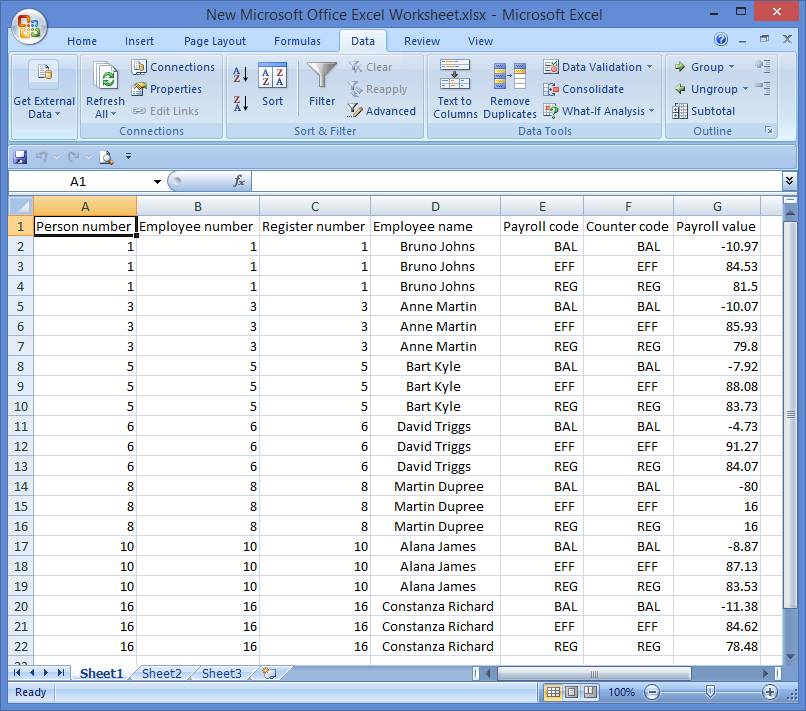
3. Here is the difference between the same export when grouping the rows and without grouping the rows. In the example below, data is grouped by Employee name. When we export some counters, BAL, EFF and REG counters, all related rows (payroll code, counter code and payroll value) will be put in the same line, one after another, until they reach the limit set by Maximum rows per line.
 |
|
Example of export with grouped rows by employee name in Configure Export page tab Settings in Astrow Web
|
If there is no grouping, each row will be displayed in separate lines:
 |
|
Example of export without grouped rows in Configure Export page tab Settings in Astrow Web
|
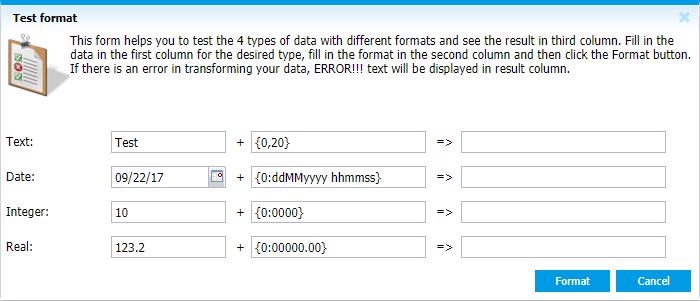
You can test various formats using the option Test. Click the button  :
:
 |
|
Test format window in Configure Export page tab Column in Astrow Web
|
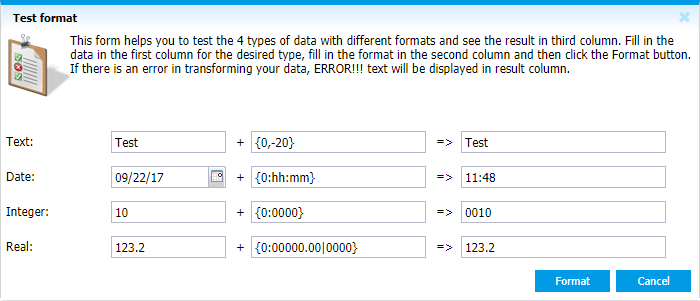
Here you can test various formats for your export column:
 |
|
Test format example in Configure Export page tab Column in Astrow Web
|