Astrow Configuration for Visitors
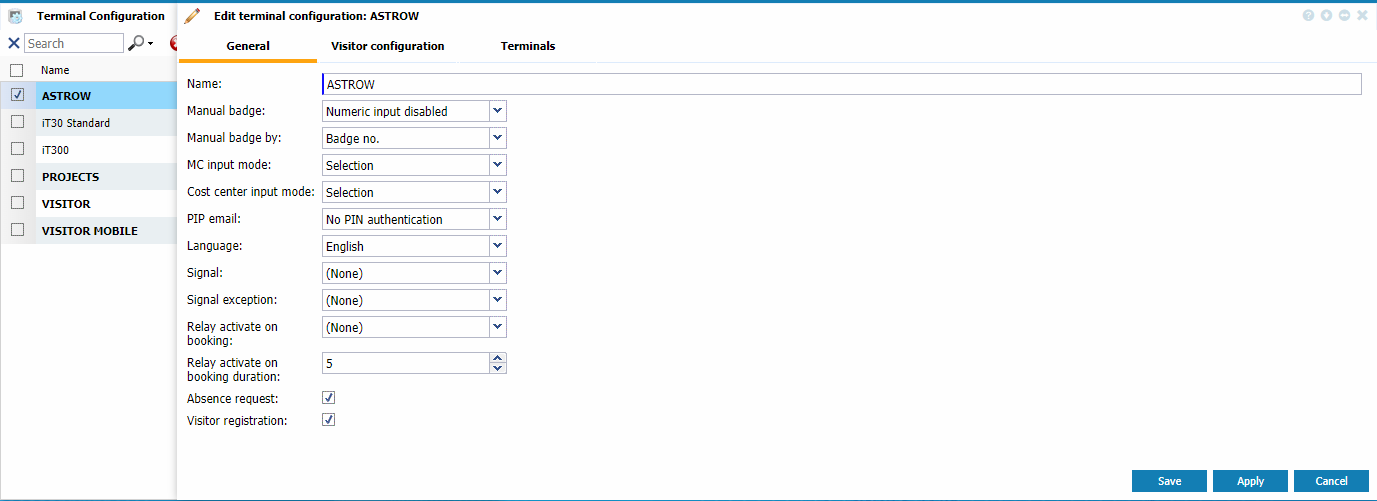
Here you can define the terminal configuration for visitors, if you use the terminal with Astrow. Go to Communication - Terminal Configuration - ASTROW and click Edit. In tab General you have the possibility to choose the type of bookings accepted on the terminal and the language displayed:
 |
|
Editing ASTROW configuration for visitors in Terminal Configuration window in Astrow Web
|
-
Name: The name of the standard configuration.
-
Manual badge: Numeric input enabled (default value) allows generating bookings via keypad; with Numeric input disable bookings can be done only by using a card.
-
Manual badge by: Only if Numeric input is enabled - bookings can be made by typing the badge no., employee no., or register no.
-
MC input mode: This field specifies how to enter an MC code (management code) to the terminal. There are 2 options available:
-
Selection: Enables the selection of the MC code from the terminal.
-
Numeric input: Enables the key in of the numeric MC from the terminal keypad.
-
Cost center input mode: This field specifies how to enter a CC code (cost center code) to the terminal. There are 2 options available, the same as for the MCs mentioned above.
-
PIP email: This sends the existing PIP situation via email when the user presses F5 on the terminal. This is important moreover in emergency situations. You can deactivate this function by selecting Disable, however this is activated by default without PIN authentication. You can also activate it with PIN authentication.
-
Language: Choose the terminal language from the ones supported.
-
Signal: This drop-down list contains all existing signal program definitions (see Signal Definitions). You can either select a signal program to be applied, or select (None) (default value) if you don't use any signals.
-
Signal exception: This drop-down list contains all existing signal exceptions definitions (see Signal Exceptions). You can either select a signal exception to be applied, or select (None) (default value) if you don't use any signal exceptions.
-
Relay activate on booking: This activates a relay defined at booking (e.g. opens a door).
-
Relay activate on booking duration: This activates a relay defined at booking after a duration defined (e.g. opens a door).
-
Absence request: If checked, absence requests can be made directly on the terminal.
-
Visitors registration: If checked, the terminal will accept visitors registration.
|
|
If you use Astrow configuration with Visitors, please check the parameter Visitors registration.
|
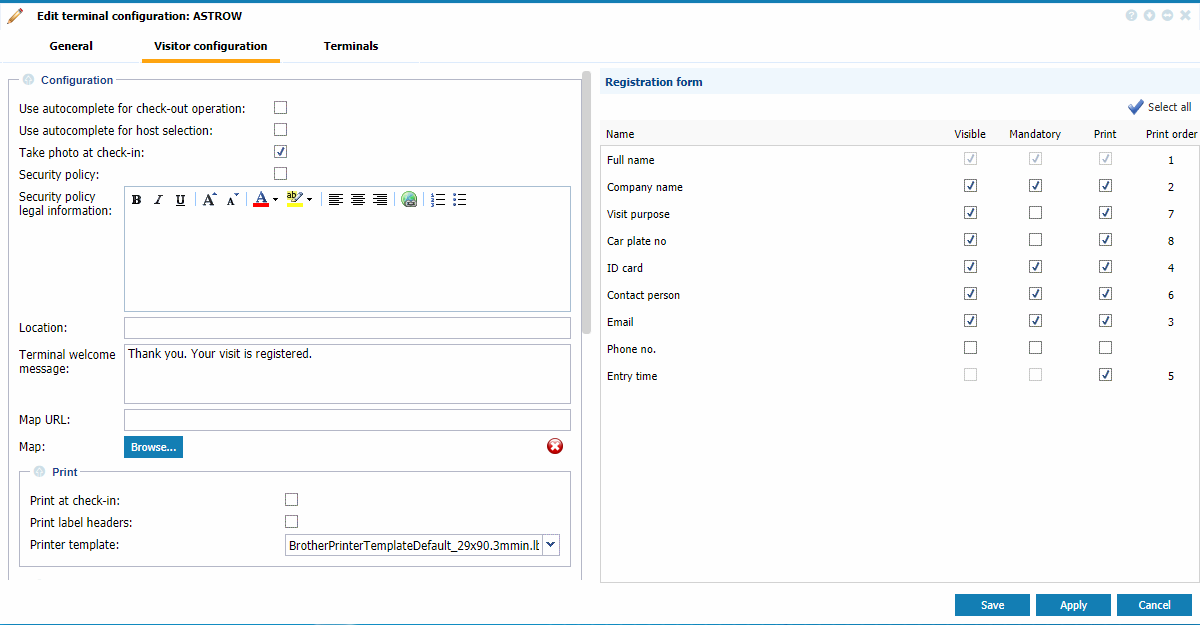
The terminal display can be set in tab Visitor configuration:
 |
|
Editing ASTROW configuration for Visitors in Terminal Manager window in Astrow Web
|
Here is a detailed explanation of each option:
Configuration
Use autocomplete for check-out operation: If checked, at check-out the visitor will need to fill only the first 3 letters of the name and the autocomplete function will display all the information (see Check-in / Check-out Visitors).
Use autocomplete for host selection: If checked, the autocomplete function will be also available for host.
Take photo at check-in: If checked, a photo will be taken when registering. This will also be sent by email to the contact person and stored in Visitors List and on the terminal.
Security policy: If checked, the terminal will ask that the visitors read and sign the security policy before storing their personal information.
Security policy legal information: Here you can state the security policy for your visitors.
Location: Write the location.
Terminal welcome message: Here you can write a welcome message to be displayed after registering.
Map URL: Here you can add the URL map link. The visitor will receive these details on email and/or SMS.
Map: Here you can upload a photo with the building map.
Print
Print at check-in: If checked, a ticket will be printed at check-in.
Print labels headers: If checked, the label headers will be printed on the ticket.
Printer template: Here you can set the printing template for visitor labels. To set the printer(s), please see Installing the Tickets Printing Machine. Please note that the definition here will be overwritten by the one in Terminal Manager (see Editing the Printer).
SMS
|
|
Please contact your distributor for the activation of the SMS service!
|
Send SMS to visitor at check-in: If checked, the visitor will receive an SMS with their visit details after registration.
Send SMS to contact at check-in: If checked, the contact person will receive an SMS with visitor's details.
SMS welcome message: Here you can set the SMS welcome message.
User name: The user name for the SMS service (please contact your supplier!).
Password: The password for the SMS service (please contact your supplier!).
Parameters (Not in this version): Other parameters required by the server (please contact your supplier!).
Front desk
Notify user: If checked, this notifies the user in Astrow Desktop. The user will receive a notification when a Contact reception visitor registers (for more information, see Contact Reception and Astrow Desktop).
Phone no.: Here you can set the mobile of the contact for SMS notification. You will need the SMS service activated (please contact your supplier!).
Email: Here you can set the email of the contact for notification.
Terminal welcome message: Here you can set the message to be displayed on the terminal after registration.
Registration form
The registrations form sets the fields of the terminal and the printing fields order on the tickets.
Visible: If checked, the items will appear as fields on the terminal.
Mandatory: If checked, the fields will be mandatory at registration.
Print: If checked, the fields will appear on the ticket label.
Print order: Here you can set the print order on the label (from 1 to 8).
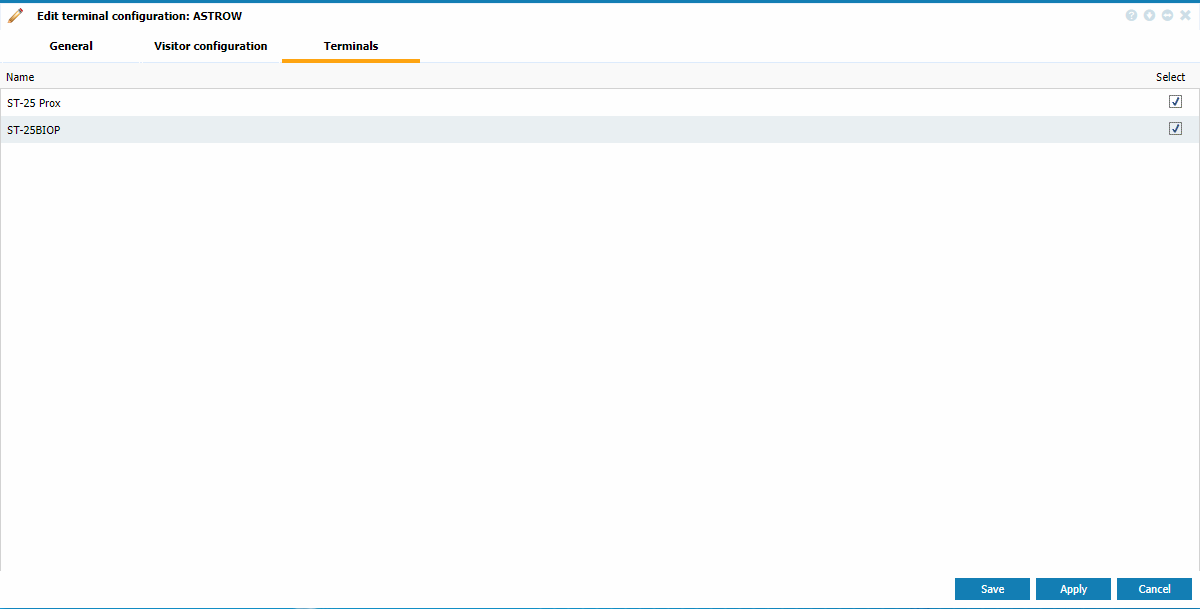
In tab Terminals, there are listed the ST-25 terminals with the configuration ASTROW.
 |
|
Checking the terminals assigned in ASTROW configuration in Terminal Configuration window in Astrow Web
|