To add an iT30/iT300 terminal, go to Communication - Terminal Manager and click  . Or, if the terminal is already in your network, but not yet defined in Astrow, you can go directly to
  and add it from here (for more details, see Discover iT-30/iT-300 Terminals). Select the type iT30 or iT300:
|
|
|
Choosing the type IT-300 for new terminal definition in Terminal Manager window in Astrow Web
|
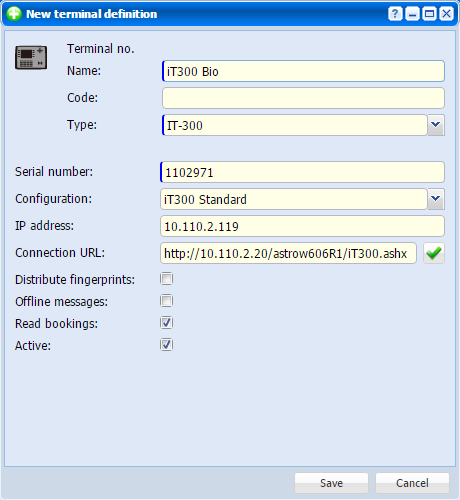
Define the following:
Terminal number: A number assigned by the application after save.
Name: Each terminal is described with a name (max. 32 characters) that is used as a reference in other functions.
Type: Select IT-30 or IT-300.
Code: Internal identification code (optional).
Serial number: The serial number of the terminal.
Configuration: Choose a configuration for your terminal from the ones defined (see Terminal Configuration for more details).
IP address: This is the local or public IP of the terminal. If the terminal is not in the same network with Astrow, write a public IP of the terminal to communicate with the application.
Connection URL: This is the connection URL of the server; structure: http://<server name>/astrow/it300.ashx. If the server has more IPs, you need to define here the one to be applicable. Button  will fill the server IP automatically.
If the proxy server is on a port other than 80, append the port number of the proxy server, separated by a colon:
http://<server name:port number>/astrow/it300.ashx
Example: http://192.168.1.111:808/astrow/it300.ashx
Distribute templates: Check this option if your terminal is bio.
Enrollment terminal: This options is available only for bio terminal if Distribute templates option is checked and enables the possibility of collecting fingerprint templates from the terminal to be distributed on other iT300 terminals.
|
|
If you want to define a bio terminal for local enrollment, do not check the options Distribute templates and Enrollment terminal. If you already have a bio terminal defined for local enrollment and you need to change the options for distribution, please note all the existing templates will be lost.
If you have 2 bio terminals, one for distribution and one for enrollment, please make sure you check only Distribute templates on the first one and check both options on the second one. This way the templates collected enrollment terminal will be distributed on both terminals.
|
Auto collect fingerprints: This options is available only for bio terminal if Distribute templates option is checked and enables the possibility to auto collect the fingerprints once registered.
Offline messages: If the option is checked, in case the terminal is not connected with the application, it will display the result group options from the last synchronization; if not checked, it will display only the name of the employee when booking.
Read clockings: If this option is checked the bookings will be sent in Astrow; if not checked the terminal will not save the bookings (in case the terminal is used only for access).
Active: If checked, the terminal is active and ready to be used.
|
|
|
Defining a new IT-300 terminal in Terminal Manager window in Astrow Web
|
Save the changes made and the terminal will be added.
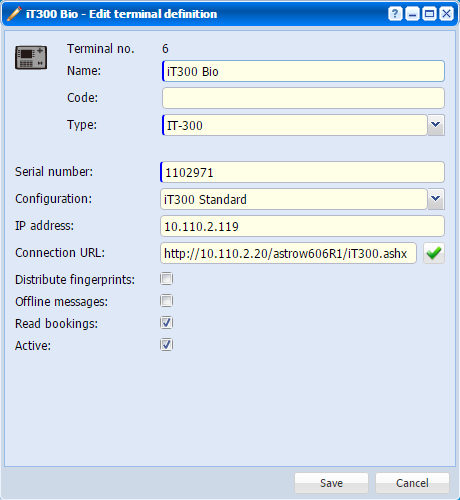
To edit an iT300 terminal, go to Communication - Terminal Manager, double-click on the terminal or select the terminal and click  .
.
|
|
|
Editing a new IT-300 terminal in Terminal Manager window in Astrow Web
|
|
|
All existing iT30 terminals will require a manually firmware upgrade for this version of the application, this is done automatically only when upgrading the application from Astrow 5. To upgrade the firmware, see Upgrading the Firmware of a Terminal.
|