Before using an iT20 terminal defined, you need to configure it first. To do this, go to
Communication - Terminal Manager, select a terminal and click

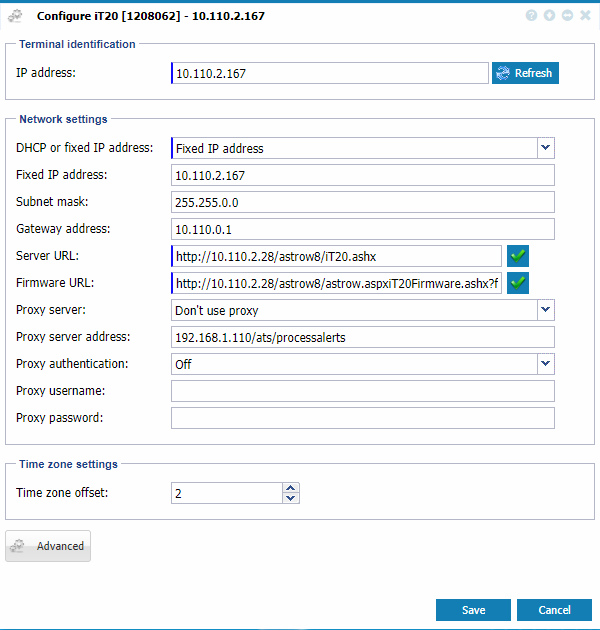
. Configure iT20 page opens:
|
|
|
Configure iT20 window command from Terminal Manager window in Astrow Web
|
Define the following:
DHCP or fixed IP address: Select DHCP or Fixed IP Address. If you select Fixed IP Address, type the IP address, subnet mask, and gateway address. If you select DHCP, the iT20 connects to the network and received addressing information from the network DHCP server, including subnet mask and default gateway.
Fixed IP address: If you are using Fixed IP Address, enter the IP address you want assigned.
Subnet mask: If you are using Fixed IP Address, enter the subnet mask you want assigned.
Gateway address: If you are using Fixed IP Address, enter the gateway address you want assigned.
Server URL: This is the connection URL of the server; structure: http://<server name:port number>/astrow/it20.ashx. If the server has more IPs, you need to define here the one to be applicable. Button  will fill the IP automatically.
Firmware URL: This is the URL where the firmware can be found. If the server has more IPs, you need to define here the one to be applicable. Button will fill the IP automatically. Structure: http://<server name>/astrow/iT20Firmware.ashx?file.
Proxy server: Use Proxy to communicate via a proxy server.
Proxy server address: Enter the address of the server. If the proxy server is on a port other than 80, append the port number of the proxy server, separated by a colon.
Example: 192.168.1.111:808
The proxy server is on the local network at address 192.168.1.111 and at port 808.
Proxy authentication: If iT20 will authenticate via username and password, select On.
Proxy username: If Proxy Authentication is On, enter the user name.
Proxy password: If Proxy Authentication is On, enter the password.
Time zone offset: Type the time offset in hours from UTC for the terminal. Use a + to indicate forward time and - to indicate backward time.
Clicking Save will reboot the terminal before the new configuration applies.
For more settings, click on

. This will open the configuration page of iT20:
user: PAYmate
password: 8608705000
Reboot the terminal in order to apply the advance settings. The terminal should be connected after this operation.
|
|
For more information about configuring an iT20, please check iT20. Installation & Configuration Manual.
|