Automatic Import of Employees
To schedule the import of employees from a file, you need to:
1. create a template import file and define the import options;
2. define a schedule task in Task Scheduler.
This way the service will check at the scheduled time for the import file and import data if existing.
To make employees definitions quickly and operational in the same time, you can create a .txt file and import it in Astrow Web. The minimum information required is the first name and badge number, separated by delimiters.
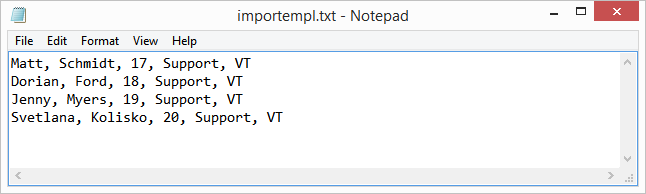
In order to create an template import file, open a notepad document and write your data. Besides the name and badge number you can add information on all fields existent in the employee definitions. Make sure you keep the order of the records in rows.
|
|
|
Employees file for import in Astrow Web
|
Save the file into location.
To import employees, go to
Configuration - Employees and click the button  .
.
|
|
|
Upload import file in Employees window in Astrow Web
|
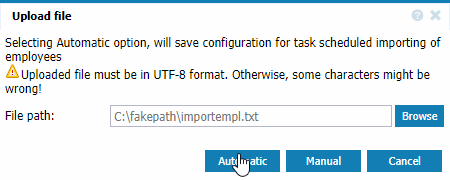
Select the automatic option:
|
|
|
Manual selection for import in Employees window in Astrow Web
|
Upload your file. The wizard opens.
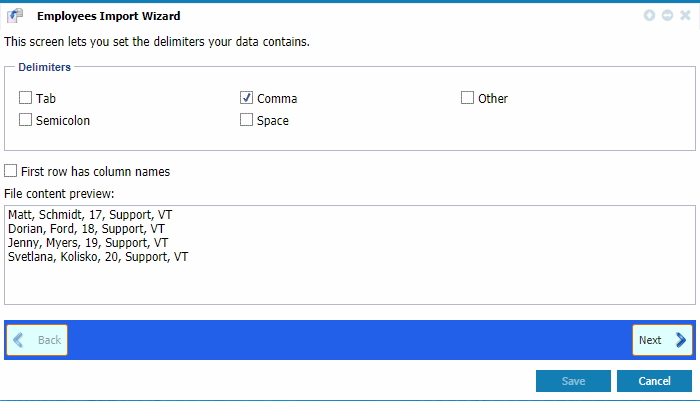
Step 1: Choose the delimiter used.
Select the delimiter used and click Next.
|
|
|
Employee Import Wizard - Choosing delimiters in Employees window in Astrow Web
|
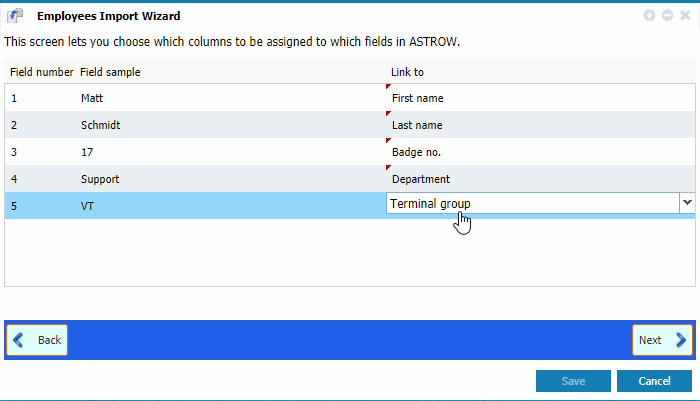
Step 2: Assign the correspondent employee fields.
Click the drop-down lists to select the correspondent field.
|
|
|
Employee Import Wizard - Assigning fields in Employees window in Astrow Web
|
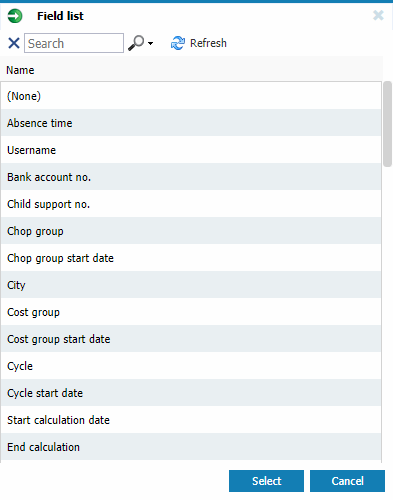
A list with all fields in employee definitions will open. Choose the correspondent field for your data type.
You can also search  the fields by their name. Use X to clear the search.
|
|
|
Employee Import Wizard - Choosing delimiters in Employees window in Astrow Web
|
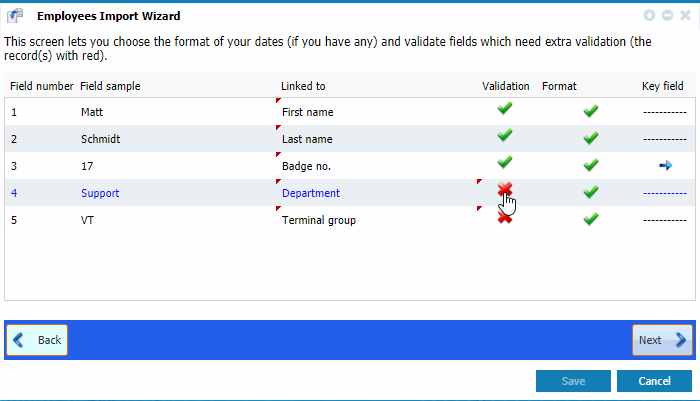
Step 3: Validate fields
In this step you need to validate the fields which need extra validation.
|
|
|
Employee Import Wizard - Validate fields in Employees window in Astrow Web
|
In the example above, some fields associated with Department and Terminal group need extra validation. Click on the button mark  to validate the fields, that meaning linking them to existing ones. If you validate them without any linkage, the fields will remain unfilled when importing them.
|
|
|
Employee Import Wizard - Link values for validating fields in Employees window in Astrow Web
|
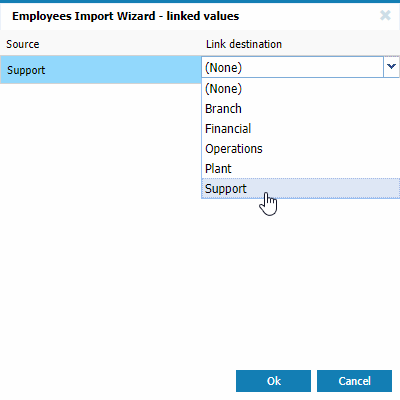
If all the fields were validated  , click the validation key
  and check the field. Next to import your data.
|
|
|
Employee Import Wizard - Validating key field (badge number) in Employees window in Astrow Web
|
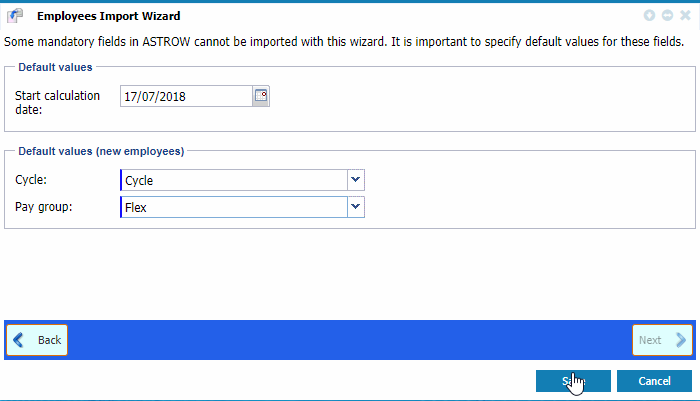
Next define the start calculation date, cycle and pay group. Click Save to import the employees.
|
|
|
Employee Import Wizard - Defining start calculation date, cycle and pay group in Employees window in Astrow Web
|
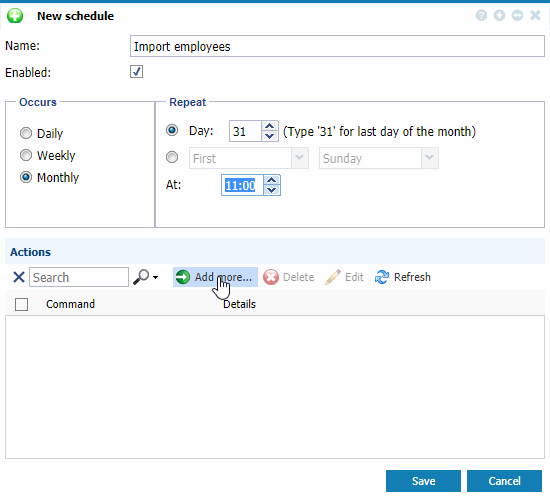
Step 4: Add a task in scheduler.
Go to Operations - Task Scheduler - New and define an automatic import (see Task Scheduler for more details).
|
|
|
Defining an import employee task schedule in Astrow Web
|
Select the path of the folder for import files. Here you will put the files each time you need to import.
|
|
|
Defining the path of the import file when adding an import employee task schedule in Astrow Web
|
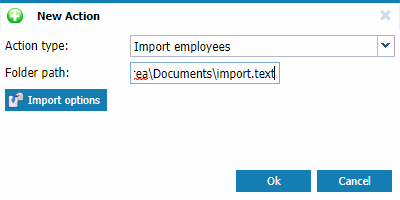
Click  to check the import options:
|
|
|
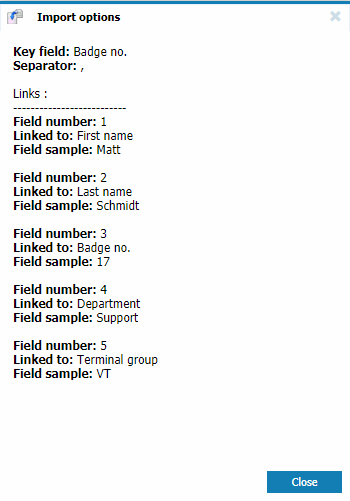
Import options for the file to be imported periodically
|
All import files must have the same configuration. If you need another configuration, delete the task and follow the same process.
|
|
In case you already imported Cycle and Pay group, the definitions here will apply only for the empty records in those fields. This will not overwrite the data in your import file.
|
If the import was successful, the new added employees will be listed in Employees page periodically.
|
|
If there are duplicate badge numbers in the import file, you will receive a notification message. If you choose to continue, the application will import only the first occurrence.
If the import finds a duplicate badge number with a number already existing in the application, please note that it will update the information existing with the information in the file!
|
After completion, imported files will be automatically added in a new folder created by the application, CompletedImportsFolder. Just make sure you won't put your files to be imported in this folder.